For my son’s fifth birthday, he asked for a Minion cake. I am always up for a cake challenge, so I quickly agreed – he didn’t need to know that I had absolutely no idea how to make a Minion cake. Since his birthday is in the middle of the summer, the audience for his birthday cakes is very forgiving. Basically, my parents, my sisters, and my brother, are the only ones eating it with us and they will heap praise on whatever I make because that is the sibling code. Well, at least that becomes the sibling code… There might not have been such a lovefest back when we were younger.

Ever since I made a Rocket cake (as in Rocket from Little Einsteins!), I have been a huge fan of any cake that has a pronounced dome shape. I love to wow people (ie my parents) by cooking a cake in a pyrex bowl and flipping it over and having the perfect dome. Did you know that you could cook a cake in a Pyrex? It’s true. My only warning would be to never, ever, ever put a hot pyrex down on a cool countertop… That’s my Public Service Announcement for today. To cook a cake in a Pyrex, think of it like a bundt cake in terms of time. I kept the temperature at 350 degrees and checked it after about 50 minutes.
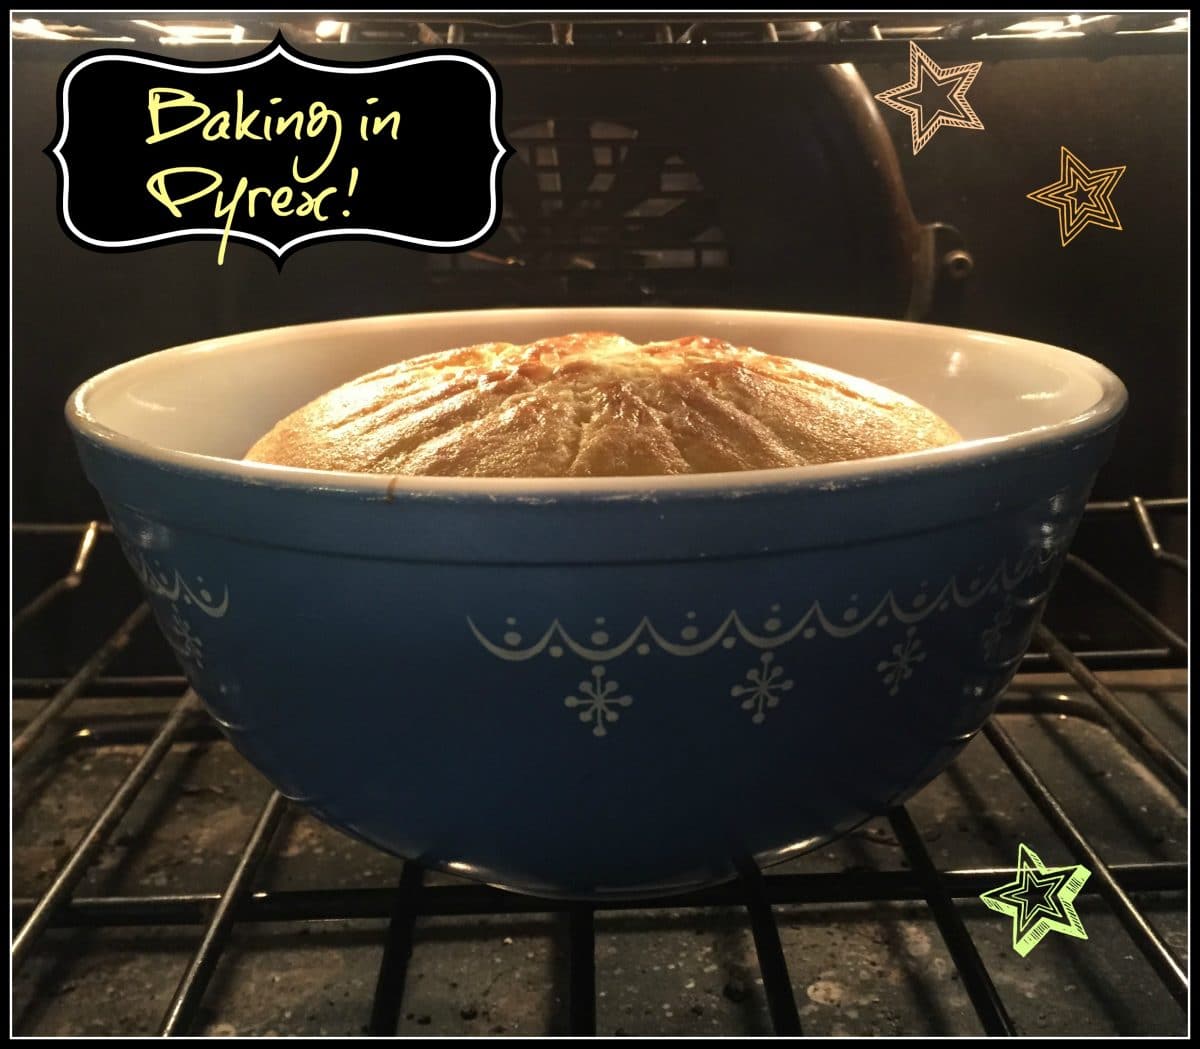
Since Rory wanted a vanilla and a chocolate cake, because, well, he’s turning 5, and it’s hard to pick just one flavor, I made the dome in vanilla and then made the lower layer – a regular round cake pan – in chocolate. I used a King Arthur Flour Yellow Gluten-Free Cake mix for the top and a Betty Crocker gluten-free chocolate cake mix for the bottom. I needed to save my skills for the Minion decorating and, truthfully, I was worried that if this cake adventure was a bust, I would feel less bad if I hadn’t spent so much time on the cake making portion of the project. 😉
For the frosting, I made a vegan vanilla buttercream and frosted both cakes together before attempting to get started with the fondant. Frosting is really necessary when using fondant for two reasons – 1.) the fondant needs something to stick to, and 2.) some people think fondant is pretty but gross and don’t eat it.
I bought my fondant at Michael’s. They have an excellent selection of fondants from Wilton as well as from Duff. Since I knew I would need a large amount of yellow fondant, I bought a large box of yellow fondant (1 lb). For the other colors, I bought a small amount of blue fondant and then a large amount of white fondant that I would be able to dye to make any additional colors.
I am a total newbie to fondant but, for birthday-at-home purposes, it’s pretty fun to play around with it and see what you can do. Fondant is like a cross between a pie crust and playdough. Rolling it out is pretty straightforward – I like to roll it on wax or parchment paper so it doesn’t stick too the table or counter. I also like to dust the parchment paper with powdered sugar before I get started. Fondant works best when it’s a little bit warm so roll it and knead it a bit with your hands to loosen it up. You can also put it in the microwave for a few seconds.
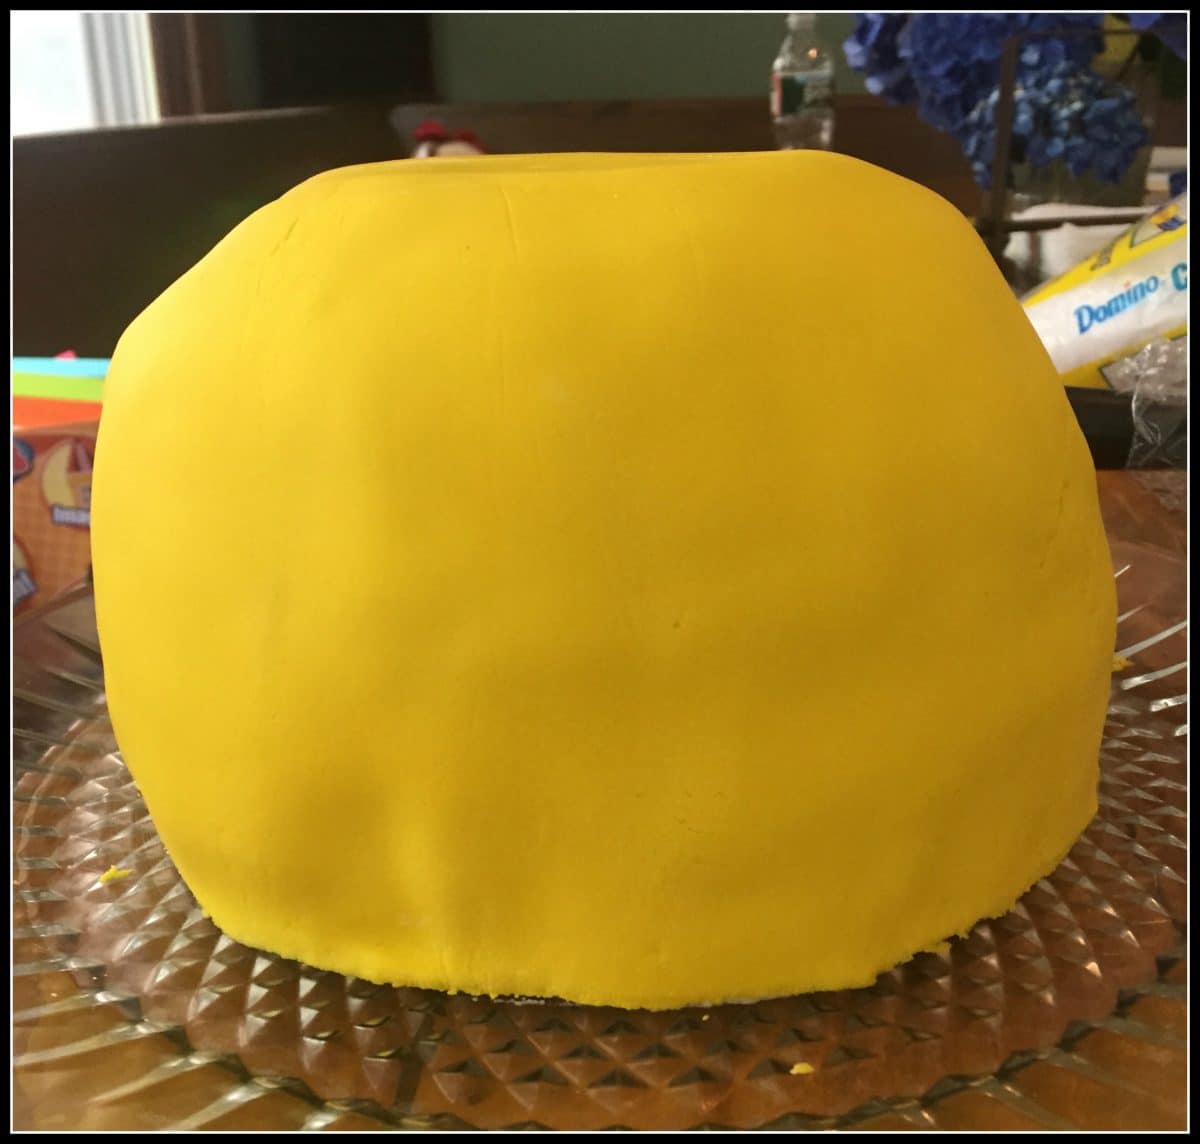
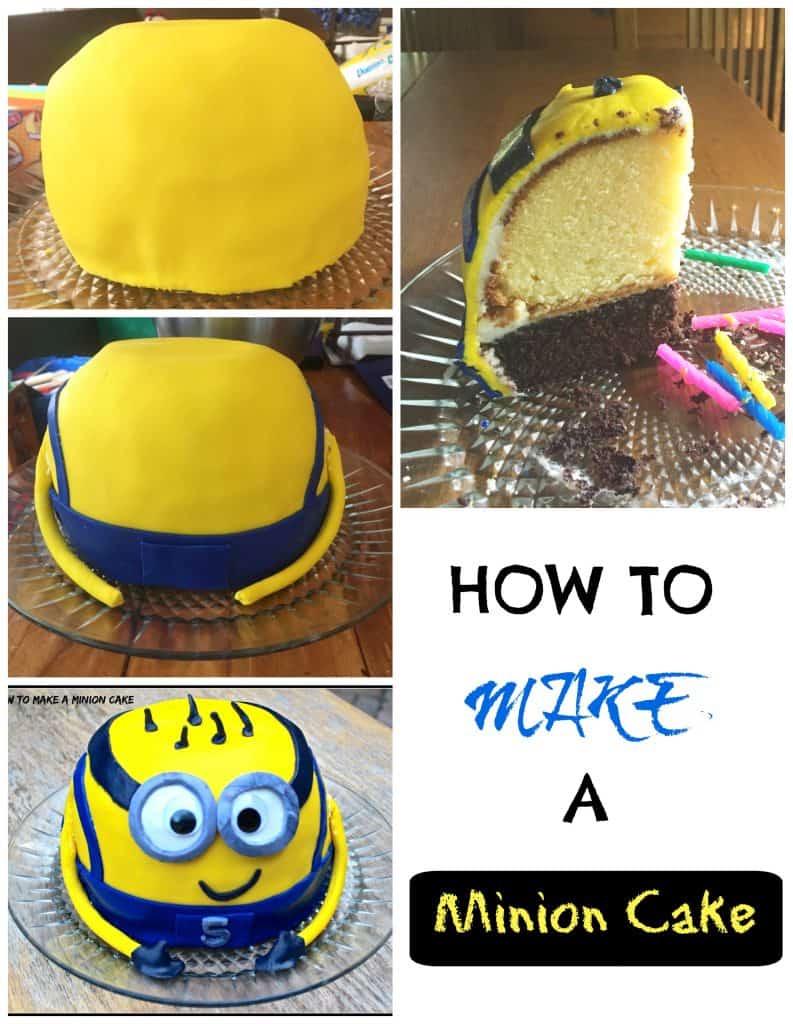
For this minion cake, I started with the most daunting task – rolling out the yellow fondant in one piece big enough to cover the entire minion dome shape. Deep breaths. I warmed up the fondant, kneaded it with my hands until it was pliable, and then laid it in the center of a piece of large parchment paper dusted with powdered sugar. Using a rolling pin, I rolled it out just like I would a pie crust. I started from the center and worked my way out from the middle. After every 5 or 6 rolls, I flipped the fondant over and rolled it out on the reverse side. To make it big enough to fit over my Minion dome, I really just eye balled the size. The fondant was about a 1/4 inch thick when I felt that I had a big enough circle to fit overtop of everything. I carefully lifted the yellow circle and gently placed it over my frosted cake. I smoothed out the fondant starting at the top of the cake and working my way down. I trimmed the excess with a sharp knife and set it aside so I could make the arms.
I am happy to report that I really only had one tearing incident! I dipped my fingers in water and smoothed out the portion of the fondant that tore a bit and then decided that spot would be perfect for one of the arms… When in doubt, cover it up.

The Details …
For the overalls, roll out blue fondant and cut using a knife – I used a butter knife and a razor blade intermittently. The overalls are a great way to cover up the bottom edge of your cake if it looks a little bit rough! I also cut out a blue square for a pocket so I could put the number 5 on the front for Rory’s birthday – he LOVED seeing the 5 on the cake!
For the overall straps, do your best to place them somewhat over the top of your cake. Again, I used this opportunity to strategically place the fondant over anything that might look less than perfect on the yellow fondant.
For the arms, pretend the fondant is playdough and roll out a couple of super skinny arms! Stick them on! To make everything adhere to each other, I kept a small bowl of the vegan buttercream frosting at my side. I used the frosting as the “glue” to hold everything together. It worked like a charm!
For the googly eyes, would you believe that Rory got a birthday card the morning I was making his cake that had two big googly eyes on the front of the card? I took that as a sign from God that this cake was meant to be! I took the eyes off the card and adhered them to the fondant using the buttercream frosting.
To make the glasses, I took plain white fondant and added a couple drops of black dye – just a tiny bit – black can be a powerful color! I was trying to get a silvery look to the fondant. I cut out circles using my razor blade to fit around the googly eyes.
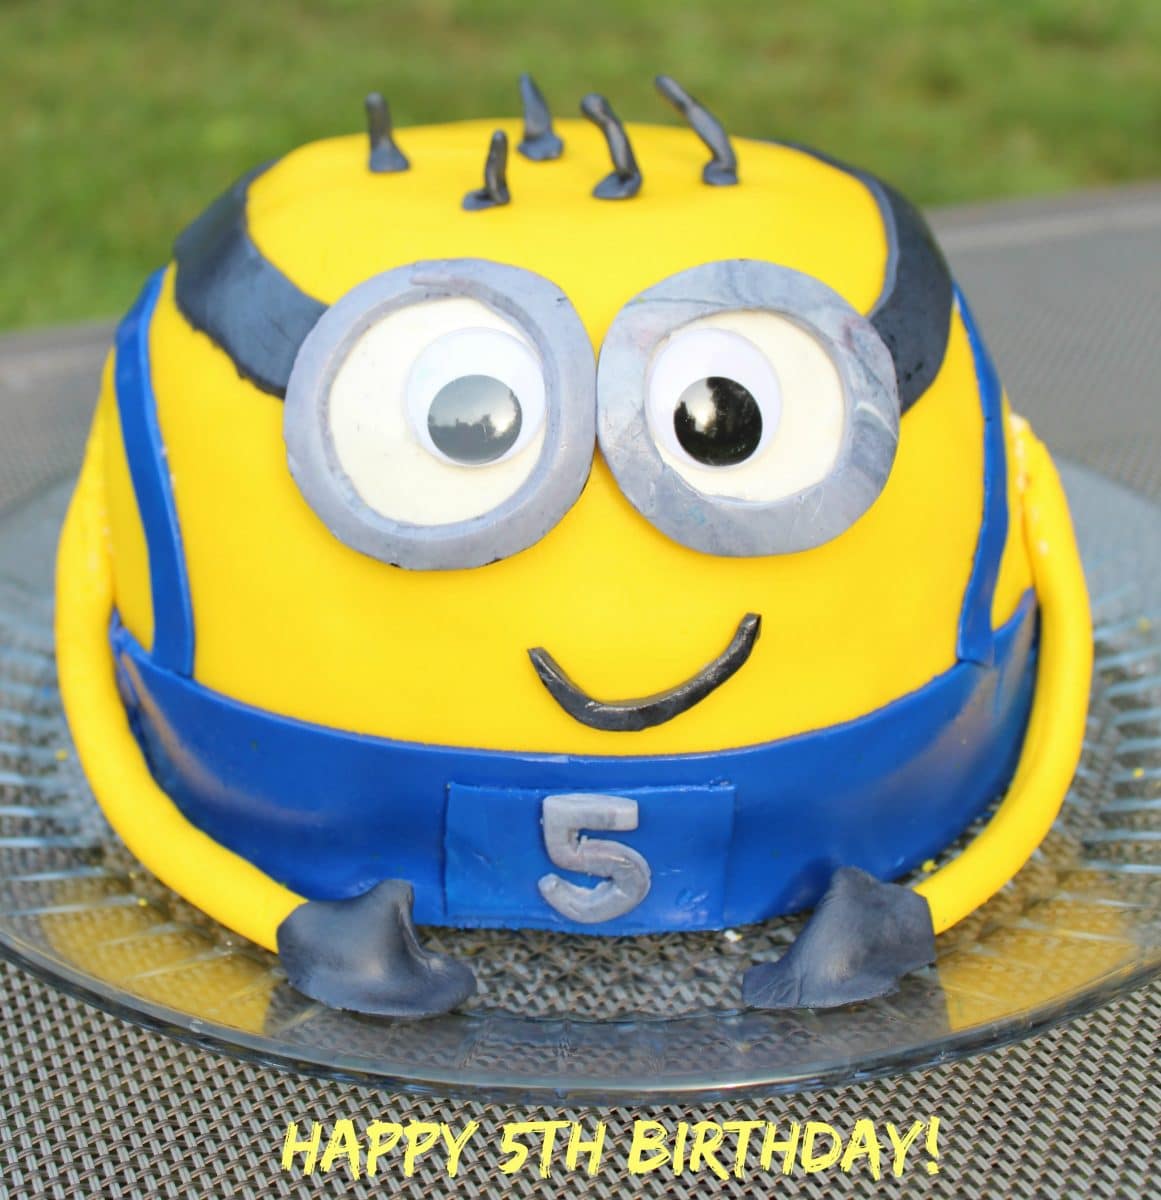
To make the headband, I dyed more white fondant with the black food dye. The best food dye is the gel type – don’t use the liquid dropper type of food dye. You will cry. The colors won’t be very vivid! Roll out the black fondant and cut a thin strip to make the headband and attach it around the top of the yellow dome.
My husband wanted in on the action so he took some of the black dyed fondant and shaped the hands. Fondant can be really fun for kids (or spouses) – it’s pretty hard to mess it up! My kids enjoyed just making their own designs and creatures with the excess fondant I wasn’t using.
Add any extra details you wish! I added some spiky hair to mine and the number 5. Check out the internet to find thousands and thousands of minion photos. Use those to help you design your own unique Minion cake!


Wow, this is awesome! I have a 5 year old son too and I have no idea what I would have done had he requested a minion cake, ha! You did such an amazing job, love it!
Thanks, Kimberly! He was wowed so I was happy!
My 6 year old son loves minion so I plan to surprise him
They are pretty cute. 😉 Even my 10 year olds are Minion fans!
This is so awesome! First of all, I never would have thought to bake the cake in a Pyrex bowl – brilliant! Second, I could never be able to pull off a Minion Cake. Yours looks fantastic andI know your son must have been thrilled!
Thanks, Joanie! I kind of feel like wonder woman when I bake a cake in a pyrex bowl! 🙂
Brings back a lot of memories of cake making when my kids were little. What a good mom…this is adorable!
Thanks, Barb! I have learned to lower the bar because they really LOVE whatever I make. It’s been really fun to play around and make them so happy! 😉
You absolutely ROCKED this cake Erin! Great GREAT job! And I love that you baked the top in a pyrex bowl – SO dang smart girl!
Thank you, Trish! I really was THAT excited about it. 😉